
Here are the instruction as best as I could put them together. This was all made by guess work, so obviously sizes can be changed to make it the size you'd like. :)
 Picture Above: (Poles from left to right)
8 = 53" (4'5") height
4= 42" (3'6") width
3=22" (1'10") part of length
9(including the flag)=14" (1'2") part of length
The connectors:
(I don't know the real names for these pieces so bare with me - this is the best I could come up with) Top to bottom:
8= Y - corner connectors
5= T connectors
1=+ connectors
2= L - elbow connectors

Picture Above: This has the poles with the connectors attached.

Above picture: The Base
 Above picture: The finished frame
These next pictures show the castle being drapped on.
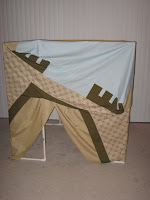
 Side window
These last two picutres are from the inside of the castle. I used velcro to open the door and windows.


No comments:
Post a Comment